As promised, here's how to make Mr. Monkey's friends for my Animal Earphone Holder DIY! LOOK AT THESE CUTIES!
Instead of filming a long tutorial, I decided to keep things simple and do a layout of how to do each :).
Mr. Polar Bear
What You'll Need:
-White Felt (all felt was purchased at Wal-Mart for under
$0.50 each)
-Black/Dark Brown Felt
-Grey Felt
-Velcro Circle Stickers/Hook and loop fasteners ($1 at
Dollar Tree in the Closet Accessories Aisle)
-Googly eyes ($1 at Dollar Tree)
-Scissors ($1 at Dollar Tree)
-Hot glue gun (been having this baby for a long time so
don’t remember exactly where I got it, but it can be found at any craft store
like Hobby Lobby, JoAnn, or Michael’s and also at Wal-Mart)
-Polar Bear template (first click on image below and then print)
Follow These Steps:
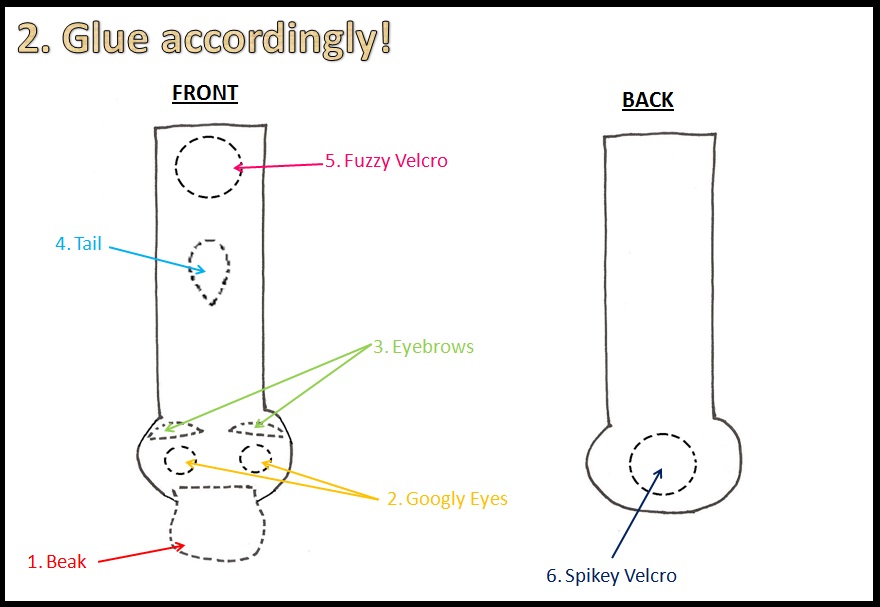
Mr. Duck
What You'll Need:
-Yellow Felt (all felt was purchased at Wal-Mart for under
$0.50 each)
-Orange Felt
-Velcro Circle Stickers/Hook and loop fasteners ($1 at
Dollar Tree in the Closet Accessories Aisle)
-Googly eyes ($1 at Dollar Tree)
-Scissors ($1 at Dollar Tree)
-Hot glue gun (been having this baby for a long time so
don’t remember exactly where I got it, but it can be found at any craft store
like Hobby Lobby, JoAnn, or Michael’s and also at Wal-Mart)
-Duck template (first click on image below and then print)
Follow These Steps:
Mr. Hippo
What You'll Need:
-Grey Felt (all felt was purchased at Wal-Mart for under
$0.50 each)
-White Felt
-Pink Felt
-Velcro Circle Stickers/Hook and loop fasteners ($1 at
Dollar Tree in the Closet Accessories Aisle)
-Googly eyes ($1 at Dollar Tree)
-Scissors ($1 at Dollar Tree)
-Hot glue gun (been having this baby for a long time so
don’t remember exactly where I got it, but it can be found at any craft store
like Hobby Lobby, JoAnn, or Michael’s and also at Wal-Mart)
-Hippo template (first click on image below and then print)
Follow These Steps:
♥♥ Winona